LESS Tips For Moar
I’ve used LESS for a little over two years now, and I just thought I’d share the things I’ve learnt about LESS that has helped me be more efficient and productive when working on the front-end.
If you don’t need to nest, don’t.
Nesting is a neat feature in LESS that allows for better code readability and maintenance. But keep in mind not to go overboard with it. After all, LESS is still essentially CSS, and all rules applied to CSS should also be applicable when working with LESS.
Take this code sample for instance,
nav {
    ul {
        /* Some styles */

        li {
            /* Some styles */

            a {
                /* Some styles */
            }
        }
    }
}
You should really be doing something like this instead,
nav {
    ul {
        /* Some styles */
    }

    li {
        /* Some styles */
    }

    a {
        /* Some styles */
    }
}
It’s important to find a balance between nesting for convinience, and nesting for function. Here’s a great article about why you should keep your CSS selectors short.
Use LESS for pseudo classes.
One more neat LESS feature is the ampersand (&), which refers to the parent selector from inside a nested selector. Using this feature for the different states of an element helps keep your code small, and much more readable.
a {
    &:hover, &:focus { text-decoration: underline }
    &:active { color: grey }
}
Use mixins.
Mixins are great. They allow you to create code fragments that can be reused throughout a project, essentially helping you avoid code duplication and reducing the overall size of your code. If you find yourself using a set of similar rules in multiple unrelated areas, you should really create a mixin for it.
Take the following example,
.highlight {
    border: 1px solid #cecece;
    background-color: #f1f1f1;
    border-radius: 5px;
}

.well {
    border: 1px solid #cecece;
    background-color: #f2f2f2;
    border-radius: 5px;
}
You could create a mixin for this that looks something like this,
.rounded-box(@background-color, @border-color, @border-radius) {
    border: 1px solid @border-color;
    background-color: @background-color;
    border-radius: @border-radius;
}

.highlight {
    .rounded-box(#f1f1f1, #cecece, 5px);
}

.well {
    .rounded-box(#f2f2f2, #cecece, 5px);
}
And remember those pesky vendor-specific prefixes? You can take care of those too.
.rounded(@radius: 5px) {
    -webkit-border-radius: @radius;
    -moz-border-radius: @radius;
    border-radius: @radius;
}
There are plenty of mixin collections that you can use. Here’s a list of the more popular ones.
Pick one that meets your needs, and if you don’t like any of them, you can always create your own.
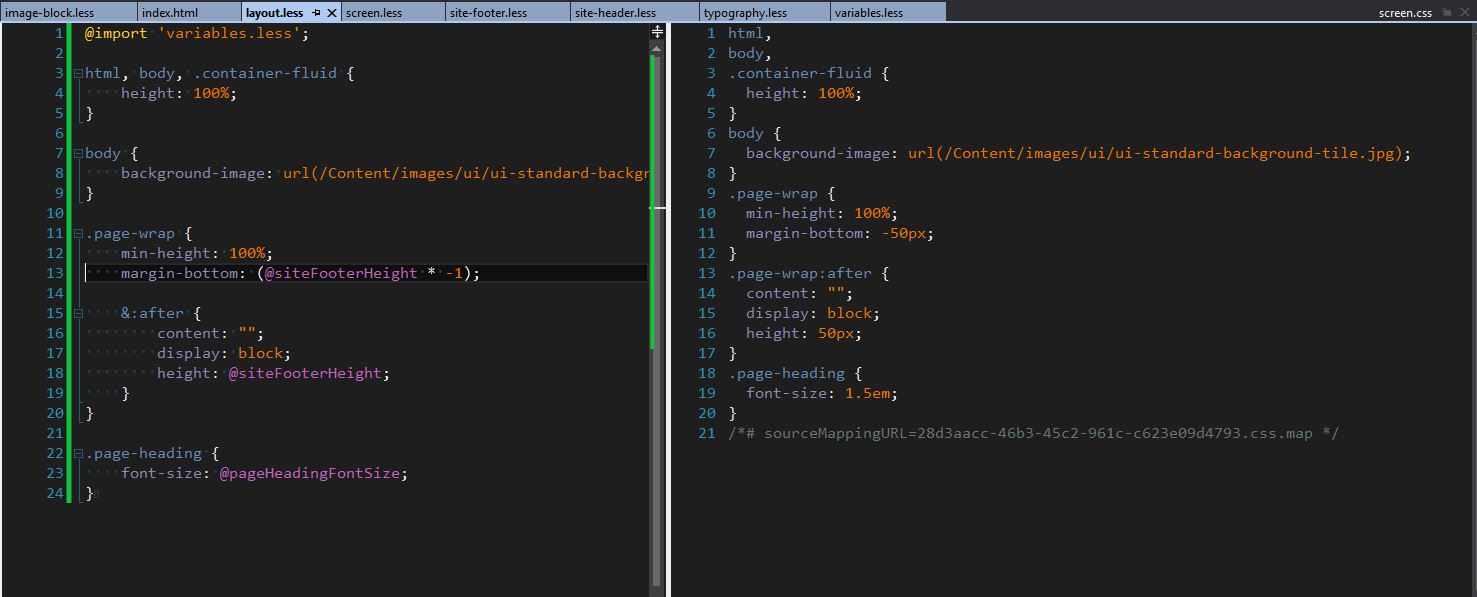
Use a real-time LESS compiler when developing.
LESS is not a language that browsers can natively understand without being compiled, and having to reload the page after every change only to find out that your code is broken is nothing short of frustrating.
It makes sense then, to use a real-time LESS compiler while you’re developing, and there are many tools available to help you achieve just that.
These tools can be set to watch for changes made to your LESS files, and run the compilation process when it detects that a changes has been made. They will also help you debug your code, a feature I personally like.
If you, like me, work primarily in Visual Studio, there’s a plugin called Web Essentials that can make working with LESS a lot more enjoyable. It can display a preview of what your compiled LESS code looks like, as well do other neat stuff like minify your code and generate source maps.
Compile and cache server-side.
As mentioned before, LESS needs to be compiled before it becomes useable. The easiest way to do this is by including the less.js client-side compiler script on your site and voila, instant CSS. The problem with this is that it increases the amount of time required to load the page, as the browser has to first parse less.js itself, and then have it process your LESS files.
Stylesheets are typically static files, so it makes sense to have it compiled and cached on the server rather than repeatedly compiling it on every page load.
There are numerous tools you can use to do this, some of which have been mentioned above.
Use source maps
Once LESS code is compiled, depending on your setup, it produces one or more CSS files. While this is great, the problem starts when you’re trying to debug a particular styling rule. Imagine a scenario where you’re looking to change one or more rules in the developer tool, and you try to find out where you should do this. Which LESS file holds line 1045 of main.css?
Source maps can help you get around this problem. Developer tools, such as the one built into Google Chrome, can parse source maps and make it appear as though you’re running the raw unminified/uncombined files. The source map parsing feature in Google Chrome was originally designed for JavaScript debugging, but its functionality has been extended to process LESS source maps as well.
You can generate source maps using the lessc command line tool, or through some of the development tools mentioned above.
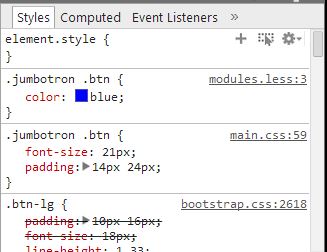
As you can see, the Chrome Dev Tool is showing precisely where a rule is located. You can even jump directly to the line on which the rule is located in the LESS file.
There you have it. My list of tips to improve your LESS experience. If you have anything to add, feel free to leave a comment down below.
Happy coding!
Wassalam