Real-time web applications with gRPC - Part 2
In my previous post, I described how we set up the back-end infrastructure for our real-time public transportation monitoring system. I will now cover the front-end setup of the application.
The idea
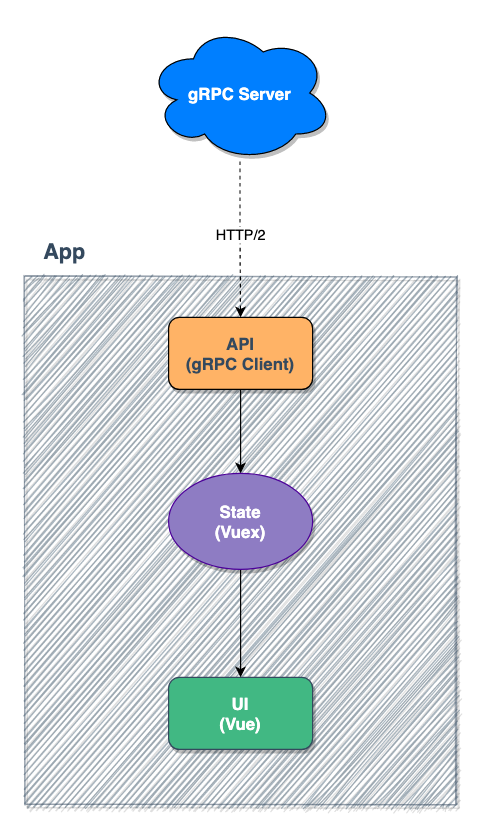
Before we proceed, I’d like to briefly describe the architectural design for the front-end application.

The idea is to receive the data from our gRPC server, feed it into the application state manager, and show a visual representation of that data to the end user.
Generating the gRPC client lib
Before we start coding, we need to first generate the gRPC client library. This will be our primary gateway to communicating with the gRPC server.
For this to happen, we needed to first set up a couple of things.
Firstly, we needed to install a protobuffer compiler, which is used to generate the client code needed to communicate with the gRPC endpoint. Fortunately, the good devs at grpc-web have provided a short guide on how to install protoc and the grpc-web plugin on your development machine, so I just followed their step-by-step guide, and soon we were ready to proceed to the next step.
The API layer
Once we have protoc and the grpc-web plugin installed, we can now generate our gRPC client library.
Behold. My gRPC client library generator command.

protoc --js_out=import_style=commonjs,binary:./src/proto --grpc-web_out=import_style=typescript,mode=grpcwebtext:./src/proto --proto_path=./Protos ./Protos/rtmap.proto
The command is quite lengthy. So, let’s break it down.
We’re basically telling protoc to generate the gRPC client library as a CommonJS module, and output the files to /src/proto (--js_out=import_style=commonjs,binary:./src/proto). Additionally, we want it to generate the service stub in TypeScript, use the grpcwebtext wire format mode, and output the files to ./src/proto (--grpc-web_out=import_style=typescript,mode=grpcwebtext:./src/proto). The generated client service is named RTMapClient, where RTMap is the name of the service we defined in the rtmap.proto file.
We’re also telling protoc where it can find any other .proto files we have referenced (--proto_path=./Protos) in the input .proto file, which is the final argument in the command (./Protos/rtmap.proto).
But why use grpcwebtext, which is simply base64-encoded string, instead of grpcweb which is binary? At the time of writing, grpcweb does not yet support binary server streaming. We will update to grpcweb once binary server streaming is supported.
We added the command to our package.json as an NPM script, because we knew that we’d be running it several times during our development cycle.
Every time this command is executed, it will regenerate the gRPC client (RTMapClient), so it’s important to do this any time you make changes to the .proto file.
The state layer
The core of the application is the Vuex store. It handles general tasks like starting and stopping the stream, as well as filling up the state property with data transmitted by the gRPC server.
Here’s a simplified version of what we’ve implemented.
import Vue from 'vue';
import Vuex from 'vuex';
import { RTMapClient } from '@/proto/RTMapServiceClientPb';
import { ClientReadableStream } from 'grpc-web';
import {
  Marker,
  StartStreamRequest,
  StartStreamReponse,
} from '@/proto/rtmap_pb';

Vue.use(Vuex);

// create an instance of the gRPC client
const client = new RTMapClient('https://localhost:5051'); // replace this with your gRPC server path
let stream: ClientReadableStream<StartStreamReponse> | undefined;

export default new Vuex.Store({
  state: {
    markers: [],
  },
  getters: {
    markers: state => state.markers
  }
  mutations: {
    setMarkers(state, payload: Marker[]) {
      state.markers = Object.freeze(payload); // make this read-only
    },
  },
  actions: {
    startStream({ commit }) {
      // create an instance of the request object
      const request = new StartStreamRequest();

      // start the stream
      stream = client.StartStream(request);

      // attach event handlers
      stream.on('data', response => {
        // convert to POJO
        const markers = response.toObject().dataList;

        // commit to store
        commit('setMarkers', markers);
      });
    },
    stopStream() {
      // cancel the stream, if defined
      stream?.cancel();
      delete stream;
    },
  },
});
I think the code is pretty self explanatory. When the startStream action is called, it starts the gRPC connection, and pushes any data it receives into the store state. And when stopStream is called, it stops the connection, and disposes the stream object.
Notice how we are not writing any API client code like we typically do with RESTful API based apps? We can skip all of that with gRPC, and simply use the client that was generated using the protoc tool. Pretty neat, huh?
The UI layer
Now that we have the client service and the state manager set up, we can hook it up to the UI - the thing that matters the most to our users. We went with a simple map application using leaflet with the vue2-leaflet wrapper, to simplify the whole process.
Here is a simple example of our implementation. The code has been simplified for brevity. The actual code is a lot larger than this, obviously ;)
<template>
  <l-map :zoom="zoom" :center="center">
    <l-tile-layer :url="url"></l-tile-layer>
    <l-marker v-for="marker in markers" :key="marker.id" :lat-lng="marker.position"></l-marker>
  </l-map>
</template>

<script>
import { LMap, LTileLayer, LMarker } from 'vue2-leaflet';
import { mapState } from 'vuex';

export default {
  components: {
    LMap,
    LTileLayer,
    LMarker,
  },
  data() {
    return {
      url: 'https://{s}.tile.openstreetmap.org/{z}/{x}/{y}.png',
      zoom: 15,
      center: { lat: 58.97, lng: 5.7331 }
    };
  },
  computed: {
    ...mapState(['markers'])
  },
  mounted() {
    this.$store.dispatch('startStream');
  },
  beforeDestroy() {
    this.$store.dispatch('stopStream');
  }
};
</script>
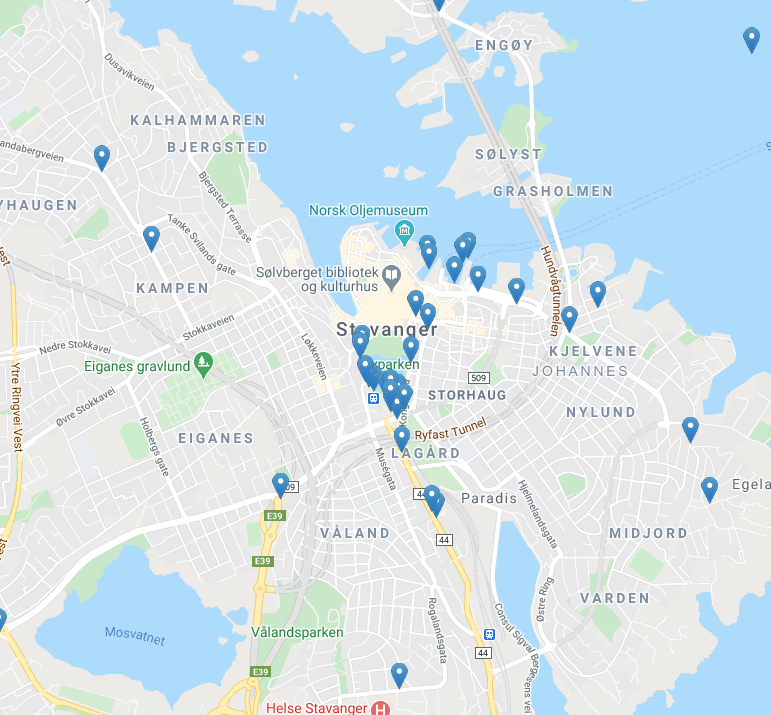
As you can see, we have the app hooked up to our Vuex store so that whenever the markers collection is updated, the app will react and display a marker on the map for every item in the collection. The app is also set up to start the gRPC stream on init, and stop it before the instance is destroyed.
The result
gRPC server? Check.
gRPC client? Check.
State manager? Check.
App UI? Check.
And the result?

Obviously the app in this post is super simple. It’s missing a lot of the features we have in the actual app, such as customised marker icons for individual vehicle types, popups, and animated marker movements. But that’s outside the scope of this post, would simply make it way longer than it already is.
