Creating a Multilingual Drupal site
Recently I’ve been working a lot with MODX, and in case you don’t know what MODX is, it’s a great content management system designed with PHP developers, such as myself, in mind. You can check it out here.
The projects I have been working on using MODX are mostly multilingual sites. MODX Evolution has a great multilingual module called YAMS (Yet Another Multilingual Solution) and it allows me to create a page with multiple resources in multiple languages. Did that sound right? Well, basically you can have a page in multiple languages, and you can switch between languages by modifying the URL - usually by adding a two-letter combination of the language you want (eg. en for English, fr for French, ru for Russian). This is great, because all the pages can use the same template so they all look the same, but by adding a language tag to the URL visitors can view the same page in different languages.
Then I wanted to make the same thing work in Drupal. I got to know that there’s also a multilingual solution for Drupal, namely the Internationalization module. I went through a few tutorials that explained how to set this up, which was fine, but it was until I found this tutorial that I managed to get a multilingual front page up and running.
So in this tutorial, I’ll be showing you how to set up a multilingual site with a fully functioning multilingual front page and nice clean URL paths to boot.
Prerequisites
In this tutorial, I’ll be using Drupal 7.8, but this should work with pretty much all Drupal 7 versions.
Here’s a list of modules you’ll need to make this work;
Install these modules and then enable the following. Drupal should let you know whether you need to enable other modules as well, so do so when asked.
- Internationalization
- Multilingual content
- Variable translation
- Token
- Pathauto
- Variable
Configuring languages
Now that you have everything installed and enabled, you’ll now need to set it up to get everything working. Let’s start by installing the languages you need for your Drupal site. Go to Administration » Configuration » Languages, where all the enabled languages are listed. You’ll most likely see just one language and in most cases it will be English. Now click Add Language, and select the language you want from the list, and click the Add Language button to enable the selected language for your site.
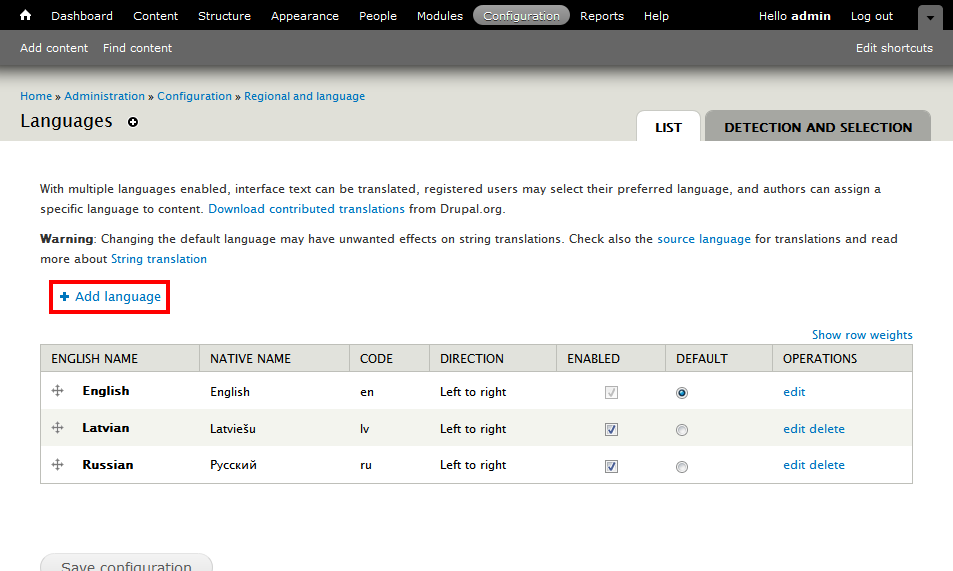
You should now see the newly enabled language in the list, under the default language. Oh, and before I forget, the order in which the languages are shown displays the level of priority given to each language, with the default language being at the top. This is also reflected in the order in which the languages are shown in the language switcher, more of which I will explain later in this tutorial.
Next, click on the Detection and Selection tab, and we’ll set up the way your visitors access each translation of your content. In this tutorial, I’ll only be using the URL detection method with the Path prefix option. This will add a two-letter abbreviation of a language to the URL, so you can have for example http://www.example/fr/content/home which will display the French translation to the home content. To do this, check the URL detection method, click Save settings, and although Path prefix should have been selected by default, click on Configure to make sure.


Updating content types
Next, we need to enable multilingual support for content types. To do this, go to Administration » Structure » Content types and select the content type you want to enable multilingual support in, for example Basic page and click on Edit for that content type.

Scroll down until you see Publishing option, click on that and under Multilingual support, select Enabled, with translation. Click Save content type, and go back to the same page to Edit another option, this time Multilingual settings. The reason for this is that unless Multilingual support is enabled in the Publishing option, the options within the Multilingual settings tab will be disabled. So now that you’ve enabled Multilingual support, you can now edit the Multilingual settings for the Basic page content type.

In the Multilingual settings, you will see several options, but the ones we’re interested in are Set current language as default for new content, and Require language (Do not allow Language Neutral). This is entirely optional, but I prefer to have everything defined, so I would enable these two options. Click Save content type and we can move on.
Adding translations
So now when you create a new Basic page, it will now have a language selection drop-down menu so you can select the language you wish to use for that post. And when you publish that post, you will be greeted with a Translate tab and links to the translated version of the same post at the foot of the content.

Click the Translate tab, and you will be redirected to the Translations page for the selected content. Let’s say I have a blog post (or article) in English, and I have Latvian and Russian set up as my additional languages. When I access the Translations page, I will see that the English version, being my default language, is already translated, but there are no translations for Latvian and Russian. That’s because I haven’t translated it yet. So to translate a content, simply click on the add translation link and you will be redirected to a Create article page, only this time you can’t select the language from the drop-down menu. Finish your translation and click the Save button to save the translation.

Now you should be redirected to the translated page (let’s say Latvian) and you should see a link to the English translation at the foot of the content. You should also notice the URL has changed, and should have the two-letter language abbreviation after the domain name, for example http://baseweb.cave/lv/blog/dienasgrāmatas-ieraksts. You should also notice that on most modern browsers (not IE) the URL may contain special characters. Pretty cool huh? Especially when you use languages like Russian and Japanese. But I’m not sure whether this will have adverse effects on search engines and I prefer to keep my URLs free from non-Latin characters anyway.

Oh and in case you’re wondering how to get rid of that pesky links at the foot of your content, navigate to Administration » Configuration » Regional and language » Multilingual settings and select the Node options tab. Now check Hide content translation link, click Save configuration and you’re done. Now you visitors will have to manually add the two-letter language abbreviation to the URL to view your content in the desired language. Thankfully, however, you can use the Language switcher block to help alleviate this problem. More on this later.

Multilingual front page
OK, now that you got everything up and running, it’s time to create a multilingual front page. Navigate to Administration » Configuration » Regional and language » Multilingual settings and select the Variable tab. Locate Default front page from the list of variables to be translated, and check it. This will allow you to add translations to the front page.

Next, create a Basic page that will be your front page, and add a translation for every language you have enabled. Now in the URL path settings, disable Automatic alias and give every page the same alias, for example, home. Save the page.

Now navigate to Administration » Configuration » System and you should now see a multilingual box at the top. Forget that for now, and scroll down until you find Default front page under Front page. Set the alias to the front page you’ve previously created, in this case, home.

Next is the tricky bit. Remember the language selector at the top of the page? Well, in a perfect world clicking another language from the list means you can edit the site parameters for that language, in this case set the default front page for the selected language. But the world isn’t perfect, and so selecting a different language from the list and changing the options will do nothing. Instead, change the URL to include the two-letter language abbreviation. For example, if the Site information URL for the default language is www.example.com/admin/config/system/site-information, the URL for the Russian language is www.example.com/ru/admin/config/system/site-information.
Once this page loads up, edit it like you did for the default language and save. Check whether the predefined URL for the default front page has the two-letter language abbreviation or not.

Next access your front page in the set language and hey presto, you should see the translated version of your front page. You have now successfully set up a multilingual front page.
Language selector
If you have disabled the translation links for your contents, chances are you’ll want a way for your visitors to see your contents in the desired languages without them having to modify the URL. You’re in luck, because the Internationalization module comes with a language switcher block that you can place anywhere on your page.

To enable this, navigate to Administration » Structure » Blocks and locate the Language switcher block. Select the region in which this block will appear, click Save blocks, and you’re done. You can now switch between languages by selecting the desired language from the language switcher.

Final words
This has been a long tutorial, but I think I got most things covered. The Internationalization module is awesome, and incredibly useful if you need a multilingual website, and not to mention easy to use. You can apply multilingual capabilities to pretty much any type of content, and switch between languages using the language switcher.
As usual, this tutorial is mainly for my future reference, but I hope it will also help anyone attempting to create a multilingual Drupal site. Please let me know if I’ve missed anything, as well as errors, in the comments.
Wassalam